In Goodies Against The Grain

Monday, July 27, 2015

Salted Caramel-Toffee Ice Cream (Dairy-Free)


I’m so sorry about the lack of recipes in these past weeks!! I’ve been extremely busy this summer (more so than I actually am during the school year) and I haven’t had much time to bake. Now, the business has eased up a bit, and I have some time to create recipes!


The recipe that I am sharing with you all today is very special and decadent.

This ice cream is completely dairy-free, refined sugar-free, and can be made nut-free by replacing the almond milk with hemp milk, or just some more coconut milk.

The toffee sort of turns into caramel when it gets stirred into the ice cream, creating a beautiful swirl, and a symphony of sweet.

Go make this, now!

Serves 6-10

Ingredients for the Ice Cream:

1 (13.5 oz) can full-fat coconut milk
1 cup unsweetened almond milk
2 Tbs raw honey
1 tsp vanilla extract

Ingredients for the Caramel-Toffee:

4 Tbs full-fat coconut milk
5 Tbs coconut sugar
1 Tbs palm shortening (or butter, or ghee)
¼ tsp real sea salt
 
Directions:

1.     In a blender, combine all the ice cream ingredients. Blend on high, until fully combined. Pour into a glass dish (I used a loaf  pan) and freeze until very cold.
2.     Pour the mixture into your ice cream maker, and process, per manufacturer’s instructions.
3.     Scoop the (now soft-serve-like) ice cream back into the loaf pan, cover with aluminum foil, and place in the freezer. Now, we’ll make the caramel-toffee.
4.     Place all the caramel-toffee ingredients in a small saucepan, over medium heat. Bring the mixture to a boil.
5.     Let it boil for about five minutes, or until it reaches 230 degrees F. (I used a candy thermometer for this.)
6.     Remove from heat, and let it cool for about a minute. Stir into the ice cream. The caramel will be very sticky. When it touches the ice cream, it will harden into toffee.
7.     Break up the little bits of toffee with your hands, and stir until it is fully incorporated with the ice cream.
8.     Place the dish back in the freezer, until the ice cream is hardened, about a few hours. When it is ready to be served, let it thaw on the counter, until scoopable. Scoop into pretty dishes, and serve!!

Wednesday, July 1, 2015

Red, White, and Blue Popsicles


Summer, the Fourth of July, and… popsicles! Popsicles that are completely
naturally-,fruit-colored, to be red, white, and blue! It is SO nice to have a healthy, cold treat to have in the freezer, because whenever I’m hot and craving something sweet, I always have them on hand!
The instructions are long, but that does not mean the recipe is hard! I just made the directions detailed, that’s all. The actual working time to make these is quite short, but there is just a lot of time in between, for each layer to freeze, before adding the next. Because of this, I recommend making the popsicles the day before you plan on serving them, so they have enough time to set.

And, one last note before you make them; sometimes coconuts come with very little, to no meat. This is why I bought 4 coconuts. The coconuts with the softest bottoms are the softest, ripest on the inside. But, if you buy coconuts with really soft, squishy bottoms, the meat might be really thin and translucent, which is not as good for cooking with. Only one of my coconuts had good, thick meat, so that’s all I could use for this recipe. If your coconuts have more meat, you will have more coconut layer, therefor making more popsicles.

Makes 14-20 popsicles (see above).
Ingredients:

The water of 4 fresh, young Thai coconuts, (about 4 cups) separated into 1 1/3 cups
The meat of  1-4 fresh, young Thai coconuts (I used the meat of 1½ coconuts)
2 cups fresh raspberries
2 cups fresh blackberries
Raw honey, to taste, optional

Directions:

1.     Make the white layer by placing the coconut meat and 1 1/3 cups coconut water in a large measuring cup or bowl. Using an immersion blender, blend until smooth. If you don’t have an immersion blender, you can use a blender or food processor instead. Pour into a container with a lid, and refrigerate for later.
2.     Make the red layer by placing the raspberries and 1 1/3 cups coconut water in the (cleaned) measuring cup. Blend until smooth, and add honey, if desired. Pour into a container and refrigerate.
3.     Make the blue layer by placing the blackberries and 1 1/3 cups coconut water in the (cleaned) measuring cup. Blend until smooth, and add honey, if desired. Pour into a container and refrigerate.
4.     Pour the raspberry mixture into each popsicle mold, filling each one-third of the way full. Place the lid on, but don’t put in any popsicle sticks, yet. Freeze for at least an hour, or until the raspberry layer is completely solid
5.     Now, take off the lid, and pour the coconut mixture into the mold, filling each one up another one-third of the way. Put the lid on, and place the sticks in, letting them stop when they hit the raspberry ice layer. Freeze for at least an hour or two.
6.     Take off the lid, and pour in the blackberry mixture, filling the molds all the way to the top. You don’t need to put the lid back on, here. Freeze for a few more hours.
7.     To remove the popsicles, run them under hot water until the ice on the side of the mold, begins to melt. Gently wiggle each stick until the popsicles pop out! Enjoy, and happy 4th of July!

Tuesday, June 23, 2015

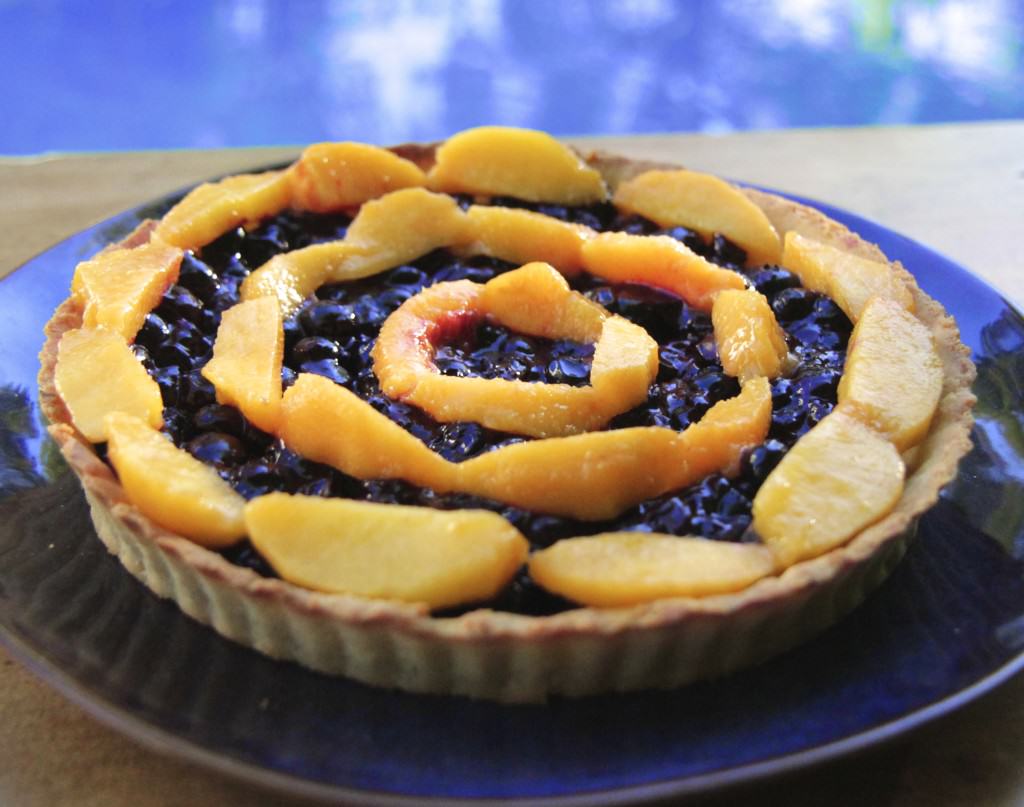
Blueberry and Peach Tart


This tart is super refreshing and sweet. I made it for Father’s Day, and my entire family was so blown away by the blueberry-peach combination, and how each blueberry exploded in their mouth!

I like to make the crust ahead of time, and freeze it, unbaked, until a couple hours before I’ll be serving it. This way, all I have to do is defrost it, and bake!
Just make sure to leave enough time for the blueberry mixture to thicken up in the fridge. It may take a few hours, but it is SO worth it!


I guest posted this awesome tart on Cook It Up Paleo, so click on the link below, and get the full post and recipe! http://cookituppaleo.com/blueberry-and-peach-tart-guest-post-from-goodies-against-the-grain/


Sunday, June 14, 2015

Watermelon Sorbet and One Year of Blogging!


Happy Sunday! Guess what? Exactly one year today, I wrote my first ever blog post! (Which today, is still one of my favorite recipes!) 

This past year of GATG has been so fun, and I love expressing myself through my recipes, and blog. Through social media and email, I’ve been able to connect with many fellow paleo bloggers, which has been so great! I am going to continue expanding my blog, and working on my cookbook, and I’m so excited to see where it will lead me.

And what is the best celebrating food ever? Ice cream! Well, actually sorbet, in this case. Sorbet that only requires 2 INGREDIENTS! Yes, please!

Let’s go make some sorbet! But first, I just want to thank all you faithful readers for reading my blog, and trying all my recipes! It means so much to me. If you try this recipe, or any others on my blog, please let me know by commenting below!

I hope you enjoy this refreshing, colllllllllddddd sorbet!


Serves ten people.

Ingredients:

10 cups seedless watermelon, cubed (or however much watermelon you have)
2 splashes lemon juice
mint leaves and sea salt, for garnish (optional)

Directions:

1.     Place as much watermelon as can fit in your blender, along with the lemon juice, (mine could fit 10 cups watermelon) and blend until smooth.
2.     Pour into your ice cream maker, and make according to your manufacturer’s instructions.
3.     Serve immediately as a slushy, or scoop into a bread pan (or other shallow dish) and freeze for 1-3 hours, depending on how soft it is.
4.     Garnish with mint leaves, and sea salt, then scoop into dishes, and serve!

Sunday, May 24, 2015

Very Berry Summer Crisp


Nothing screams summer more than a homemade berry crisp!

I know I haven’t posted in a while, but it’s all for a good reason: I am writing a cookbook! It is going to contain all paleo treats, categorized by season. In fact, this berry crisp is going to be one of the recipes in the book! I thought I’d give you a little sneak peek… and this recipe was surely the best for you to try!

It only takes a few minutes to make, yet it is all gone in a matter of seconds!

If you love berries, this crisp is for you.
If you love warm baked goods, this crisp is for you.
If you love me, this crisp is for you (thanks, Mom and Dad ;) ).
If you love chocolate, go check out every other recipe on my blog.

I like crisps alone, with no ice cream, but if you prefer yours with vanilla ice cream, go ahead!!

Serves 4-5 people.


Ingredients:

2 cups diced, hulled strawberries (or berry of choice)
1 cup blackberries (or berry of choice)
1 cup blueberries (or a different type of berry)
3 Tbs coconut sugar (or maple sugar)
3 Tbs maple sugar (or coconut sugar)
4 Tbs cold palm shortening, plus more for greasing (or organic butter)

Directions:

1.     Preheat your oven to 350° F, and grease an 8½x8½ (or 8x8) –inch glass baking dish with palm shortening or butter.
2.     Place all of the fruit in a medium bowl, and set aside.
3.     In a large bowl, mix together all of the dry ingredients. Mix in the palm shortening, using your hands, until the mixture resembles course crumbs.
4.     Layer the berries evenly, on the bottom of the greased pan. Sprinkle the crumble topping on top, covering all the berries.
5.     Bake your crisp for 30-35 minutes, or  until the fruit starts bubbling, and the top is crispy and golden.
6.     Let the crisp cool for at least five minutes before serving (so you don’t burn your tongue off). Serve in bowls, plain, or a la mode (with vanilla ice cream)!

Sunday, May 3, 2015

Ginger-Lemon-Mint Gummy Squares


Lately, I’ve really been wanting to cook, but the use of an oven, and the heat it emits into my already-hot house, just didn’t sound that fun. So, I set out to find the perfect no-cook treat to make! When I saw the huge pot of mint leaves growing in my backyard, I knew exactly what to do.

These are like that good ‘ole Jell-O you always crave! But minus all the artificial colors, flavors, and preservatives, of course! They are like the superfood of all treats, with unbelievably healing powers. And man, oh man, are they refreshing!


Ingredients:

1 large, whole ginger root, chopped and peeled (about 38 grams)
1/3 cup freshly-squeezed lemon juice
20 mint leaves
2 cups water
1 Tbs plus 1 tsp raw honey
1 Tbs coconut oil, melted, for greasing

Directions:

1.     Grease a 8½x8½ (or 8x8) –inch baking dish with the melted coconut oil, and line the bottom of the dish with a square piece of parchment paper.
2.     Place all ingredients except the gelatin and honey in a medium-sized saucepan over medium heat.
3.     Heat the mixture until the mint leaves start turning brown, and the mixture reaches a boil. Let it boil for one minute, then remove from heat.
4.     Strain the mint, ginger, and pulp out of the mixture, and into a large heatproof bowl, of glass measuring cup.
5.     Whisk in the gelatin slowly, until there are no lumps. Stir in the honey, and let the mixture sit until it reaches room temperature.
6.     Pour it into the baking dish, and refrigerate for at least 2 hours, or until it jiggles, and is slightly firm to the touch.
7.     Cut the Jell-O into squares, and serve! Leftover squares should be stored in the fridge for up to three days (if they aren’t eaten before then!)

Sunday, April 19, 2015

Strawberry, Rose, and Coconut Milkshake (Dairy-Free)


The air is becoming warmer, the flowers are poking through their soil, the little birds are chirping, and animals are having their young. It must be springtime! To me, this treat fully embraces spring with its sweet, creaminess of the fresh coconut, the bright, fruity strawberry, and the floral, springy hint of rose.


This milkshake is very rich, creamy, and soooooo easy to make! Just pop everything in a blender, and boom! Pure yumminess.

Fresh, young Thai coconuts are chock-full of nutrients, and they add an amazingly sweet creaminess to this drink. I buy my coconuts at Whole Foods, and then open them using the awesome Coco Jack, which I highly recommend buying! If you don’t have a Coco Jack, the employees at Whole Foods can open your coconuts for you. Then, all you’ve got to do is pour the coconut water into your blender, and scoop out the coconut meat using a large metal spoon.


Serves 4 people.

Ingredients:

The meat and water of 2 Young Thai Coconuts (about 2 cups meat, and 2¼ cups water)
1 heaping cup frozen strawberries (if you use fresh strawberries, I recommend adding a handful of ice cubes too, to make it cold)
1 Tbs food-grade rose water

Optional topping:
Coconut cream (the thick stuff at the top of a can of coconut milk that’s been chilled overnight)

Directions:

1.     Whip the coconut cream in a large bowl
               using a hand or stand mixer, until fluffy.
2.     Place the coconut meat and water in a high powered blender, and blend on high, until smooth and creamy
3.     Add the frozen strawberries and rose water, and continue to blend until there are no lumps.
4.     Pour the milkshake into glasses, and top with the whipped coconut cream, and serve.