In Goodies Against The Grain

Friday, September 18, 2015

Nut-Free Waffles with Blueberry Compote


So, I’ve been on this quest for a long, long, long time… it was a quest filled with trails; a quest filled with errors; a quest full of gooeyness; a quest full of sogginess; and then—a quest of joy!! Yes, my friends: It was a quest for waffles.


Grain-free waffles that were crispy. And eeeeaaaasy to make. I mean, who wants to spend their entire weekend morning stuck in the kitchen, spending hours just to make some healthy waffles?!! Surely not me! I finally concocted the perfect recipe for waffles, and you’re gonna freak out over it. Are you ready for this?

Grain-, gluten-, dairy-, nut-free waffles. Super soft on the inside, and really crispy on the outside. Take only 15 minutes to make. Drenched in blueberry compote. Oh my goodness I’m drooling just writing this.

 I urge you aaaaaalllll to make these… and if you do, please leave a comment in the ‘comment’ section below, telling me how they turned out!!

Happy Saturday!

Makes 3 large waffles, or 12 small.

Ingredients for the Waffles:

1 ½ cups Otto’s Cassava Flour, sifted
¼ tsp salt
2 ¼ tsp baking powder
2 tsp maple sugar, or coconut sugar
1 tsp ground cinnamon
2 cups full-fat coconut milk, (or almond milk, if you’re not dairy-free)
1 egg
1 tsp vanilla extract

Directions:

1.     Preheat your waffle iron, and lightly grease it with ghee, or coconut oil.
2.     Mix together all of the dry ingredients in a large bowl. Then stir in the wet, and let the batter sit for five minutes.
3.     Pour the batter into your waffle iron, (I used about one-third of the batter and did three rounds of waffles) and cook per manufacturer’s instructions.
4.     While the first batch of waffles are being made, whip up this compote!!


Ingredients for the Blueberry Compote:

1 Tbs coconut oil, ghee, or butter
1 ½ cups blueberries, frozen or fresh (or any type of berry you prefer)
1 tsp honey
½ tsp cold water


Directions:

1.     Melt the oil/butter on medium heat, in a medium saucepan. Stir in the berries and honey, and bring to a boil.
2.     In a small dish, stir together the ½ tsp water, and ½ tsp arrowroot. After five minutes of boiling, stir in the arrowroot mixture to the berry compote.
3.     Keep stirring the mixture until it begins thickening slightly, then remove from heat. Continue making the rest of the waffles, and serve them with the compote poured on top! Enjoy :)

Wednesday, August 26, 2015

Book Review: Paleo Mug Muffins by Heather Resler & A Free Chocolate Cake Recipe!


Today, I am doing my very first book review! And what a better first book to review than one by my new friend, Heather Resler, of 
Cook It Up Paleo?!!

On September first, 2015, she is releasing her new ebook, Paleo Mug Muffins!!! You guys are gonna love it! Each recipe makes a personal-size muffin that's made of one hundred percent real food ingredients; all gluten-, grain-, and dairy-free. And, many of the muffin recipes are nut-free! She really poured tons of creativity into this book. 

I mean, a whole book dedicated solely to mug muffins? 
Yes, please!

All of the pictures in this ebook are beautiful, each recipe mouth-watering, just waiting to be devoured. And, the greatest part of the whole book? Each recipe takes only a few minutes of prepping, and only one or two minutes of cooking time! All the muffins are baked in the microwave, which makes it soooo easy!

Not only are there many sweet muffins, but many savory ones, too! I can't wait to make the Avocado Bread, and the Bacon-Cheddar Muffin. Really, all of the recipes look amazing.


To download the ebook when it comes out, just click on the link right here!


Now, since I know you can't wait until the book releases, I am sharing one of my favorite recipes from it, today!! It was so fun to make this mug muffin after school today, photograph it, and then wolf it down! This recipe is for a Dark Chocolate Cake mug muffin. It tasted really rich and chocolate-y, and it was like a mild chocolate soufflé. I enjoyed mine with a dollop of whipped coconut cream. Divine! So, enjoy this recipe, and make sure to download her ebook here!

Double Chocolate Cake Mug Muffin:

1 egg
1 egg white
2 squares dark chocolate (about 1-1/2 tablespoons chopped), melted
1 tablespoon unsweetened cocoa powder
2 tablespoons coconut flour
1 tablespoon pure maple syrup
Pinch baking soda

1. Whisk the egg with the egg white in a small bowl. Whisk in the dark chocolate. Add the remaining ingredients and mix well.
2. Scoop into a large coffee cup or small ramekin and microwave on HIGH (100 percent power) for 90 seconds, or until cooked through.

• Nut Free • Indulgent but delicious!


Monday, August 10, 2015

Skillet Peach Crumble (Paleo, AIP, Vegan)


Have you ever made a dessert, and thought, “Man, I wish this recipe could be nut-free, low sugar, grain-free, refined sugar-free, gluten-free, dairy-free, vegan, and AIP!” I sure have! And that’s why I created this recipe for you.

This peach crumble is so easy to make, and free of sooooo many allergens! Lately, the fruit basket in my kitchen has been overflowing with ripe, beautiful peaches, so I knew I had to make something with them!

The crumble was perfect. It tasted so tangy and sweet, and the top was so crispy and warm. The ideal summer treat! I hope you all enjoy this crumble as much as my family and I did! Have a great day : )

Serves 4 people

Ingredients:

5 large peaches, pealed, cored, and sliced

For the crumble:

1 cup coconut flakes
4 Tbs coconut sugar
1 tsp cinnamon
1 Tbs coconut flour
4 Tbs cold fat of choice: ghee, coconut oil, palm shortening, or butter

Directions:

1.     Preheat your oven to 350 degrees F.
2.     In a medium sized mixing bowl, whisk together all the crumble ingredients except for the fat. Then distribute the (very cold) fat of choice evenly, throughout the dry ingredients, into little chunks. I did this using an electric mixer.
3.     Place all the peaches in a 10-inch cast iron skillet.
4.     Sprinkle the crumble, evenly, on top.
5.     Bake your skillet peach crumble in the oven for 40 minutes, or until the fruit is bubbly, and the crumble is golden brown. Scoop into bowls, and serve!

Monday, July 27, 2015

Salted Caramel-Toffee Ice Cream (Dairy-Free)


I’m so sorry about the lack of recipes in these past weeks!! I’ve been extremely busy this summer (more so than I actually am during the school year) and I haven’t had much time to bake. Now, the business has eased up a bit, and I have some time to create recipes!


The recipe that I am sharing with you all today is very special and decadent.

This ice cream is completely dairy-free, refined sugar-free, and can be made nut-free by replacing the almond milk with hemp milk, or just some more coconut milk.

The toffee sort of turns into caramel when it gets stirred into the ice cream, creating a beautiful swirl, and a symphony of sweet.

Go make this, now!

Serves 6-10

Ingredients for the Ice Cream:

1 (13.5 oz) can full-fat coconut milk
1 cup unsweetened almond milk
2 Tbs raw honey
1 tsp vanilla extract

Ingredients for the Caramel-Toffee:

4 Tbs full-fat coconut milk
5 Tbs coconut sugar
1 Tbs palm shortening (or butter, or ghee)
¼ tsp real sea salt
 
Directions:

1.     In a blender, combine all the ice cream ingredients. Blend on high, until fully combined. Pour into a glass dish (I used a loaf  pan) and freeze until very cold.
2.     Pour the mixture into your ice cream maker, and process, per manufacturer’s instructions.
3.     Scoop the (now soft-serve-like) ice cream back into the loaf pan, cover with aluminum foil, and place in the freezer. Now, we’ll make the caramel-toffee.
4.     Place all the caramel-toffee ingredients in a small saucepan, over medium heat. Bring the mixture to a boil.
5.     Let it boil for about five minutes, or until it reaches 230 degrees F. (I used a candy thermometer for this.)
6.     Remove from heat, and let it cool for about a minute. Stir into the ice cream. The caramel will be very sticky. When it touches the ice cream, it will harden into toffee.
7.     Break up the little bits of toffee with your hands, and stir until it is fully incorporated with the ice cream.
8.     Place the dish back in the freezer, until the ice cream is hardened, about a few hours. When it is ready to be served, let it thaw on the counter, until scoopable. Scoop into pretty dishes, and serve!!

Wednesday, July 1, 2015

Red, White, and Blue Popsicles


Summer, the Fourth of July, and… popsicles! Popsicles that are completely
naturally-,fruit-colored, to be red, white, and blue! It is SO nice to have a healthy, cold treat to have in the freezer, because whenever I’m hot and craving something sweet, I always have them on hand!
The instructions are long, but that does not mean the recipe is hard! I just made the directions detailed, that’s all. The actual working time to make these is quite short, but there is just a lot of time in between, for each layer to freeze, before adding the next. Because of this, I recommend making the popsicles the day before you plan on serving them, so they have enough time to set.

And, one last note before you make them; sometimes coconuts come with very little, to no meat. This is why I bought 4 coconuts. The coconuts with the softest bottoms are the softest, ripest on the inside. But, if you buy coconuts with really soft, squishy bottoms, the meat might be really thin and translucent, which is not as good for cooking with. Only one of my coconuts had good, thick meat, so that’s all I could use for this recipe. If your coconuts have more meat, you will have more coconut layer, therefor making more popsicles.

Makes 14-20 popsicles (see above).
Ingredients:

The water of 4 fresh, young Thai coconuts, (about 4 cups) separated into 1 1/3 cups
The meat of  1-4 fresh, young Thai coconuts (I used the meat of 1½ coconuts)
2 cups fresh raspberries
2 cups fresh blackberries
Raw honey, to taste, optional

Directions:

1.     Make the white layer by placing the coconut meat and 1 1/3 cups coconut water in a large measuring cup or bowl. Using an immersion blender, blend until smooth. If you don’t have an immersion blender, you can use a blender or food processor instead. Pour into a container with a lid, and refrigerate for later.
2.     Make the red layer by placing the raspberries and 1 1/3 cups coconut water in the (cleaned) measuring cup. Blend until smooth, and add honey, if desired. Pour into a container and refrigerate.
3.     Make the blue layer by placing the blackberries and 1 1/3 cups coconut water in the (cleaned) measuring cup. Blend until smooth, and add honey, if desired. Pour into a container and refrigerate.
4.     Pour the raspberry mixture into each popsicle mold, filling each one-third of the way full. Place the lid on, but don’t put in any popsicle sticks, yet. Freeze for at least an hour, or until the raspberry layer is completely solid
5.     Now, take off the lid, and pour the coconut mixture into the mold, filling each one up another one-third of the way. Put the lid on, and place the sticks in, letting them stop when they hit the raspberry ice layer. Freeze for at least an hour or two.
6.     Take off the lid, and pour in the blackberry mixture, filling the molds all the way to the top. You don’t need to put the lid back on, here. Freeze for a few more hours.
7.     To remove the popsicles, run them under hot water until the ice on the side of the mold, begins to melt. Gently wiggle each stick until the popsicles pop out! Enjoy, and happy 4th of July!

Tuesday, June 23, 2015

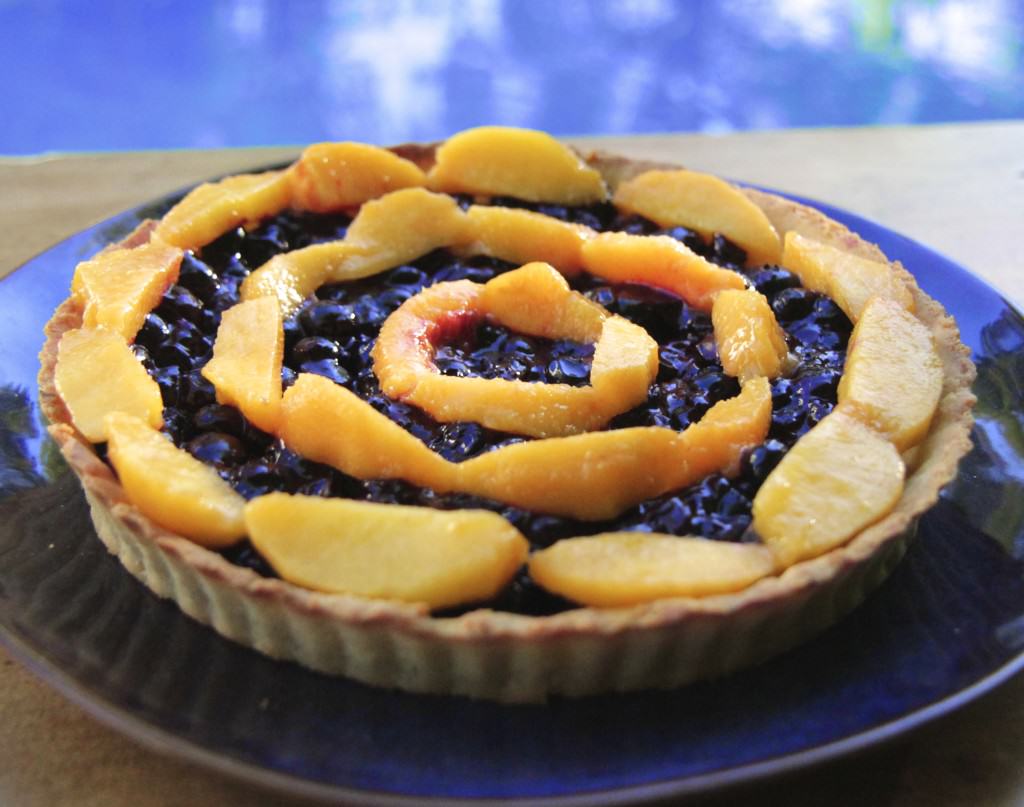
Blueberry and Peach Tart


This tart is super refreshing and sweet. I made it for Father’s Day, and my entire family was so blown away by the blueberry-peach combination, and how each blueberry exploded in their mouth!

I like to make the crust ahead of time, and freeze it, unbaked, until a couple hours before I’ll be serving it. This way, all I have to do is defrost it, and bake!
Just make sure to leave enough time for the blueberry mixture to thicken up in the fridge. It may take a few hours, but it is SO worth it!


I guest posted this awesome tart on Cook It Up Paleo, so click on the link below, and get the full post and recipe! http://cookituppaleo.com/blueberry-and-peach-tart-guest-post-from-goodies-against-the-grain/


Sunday, June 14, 2015

Watermelon Sorbet and One Year of Blogging!


Happy Sunday! Guess what? Exactly one year today, I wrote my first ever blog post! (Which today, is still one of my favorite recipes!) 

This past year of GATG has been so fun, and I love expressing myself through my recipes, and blog. Through social media and email, I’ve been able to connect with many fellow paleo bloggers, which has been so great! I am going to continue expanding my blog, and working on my cookbook, and I’m so excited to see where it will lead me.

And what is the best celebrating food ever? Ice cream! Well, actually sorbet, in this case. Sorbet that only requires 2 INGREDIENTS! Yes, please!

Let’s go make some sorbet! But first, I just want to thank all you faithful readers for reading my blog, and trying all my recipes! It means so much to me. If you try this recipe, or any others on my blog, please let me know by commenting below!

I hope you enjoy this refreshing, colllllllllddddd sorbet!


Serves ten people.

Ingredients:

10 cups seedless watermelon, cubed (or however much watermelon you have)
2 splashes lemon juice
mint leaves and sea salt, for garnish (optional)

Directions:

1.     Place as much watermelon as can fit in your blender, along with the lemon juice, (mine could fit 10 cups watermelon) and blend until smooth.
2.     Pour into your ice cream maker, and make according to your manufacturer’s instructions.
3.     Serve immediately as a slushy, or scoop into a bread pan (or other shallow dish) and freeze for 1-3 hours, depending on how soft it is.
4.     Garnish with mint leaves, and sea salt, then scoop into dishes, and serve!